What you see on your screen doesn’t come out as expected after print. That’s when crop marks, trim, and bleed lines come into play. Getting your design or any project print-ready can be challenging. Keeping the final formatting correct is key to getting the desired printing results.
In this blog, we will walk you through a handy guide to understand crop marks, safety, trim, and bleed lines before sending your design or document to the printer.
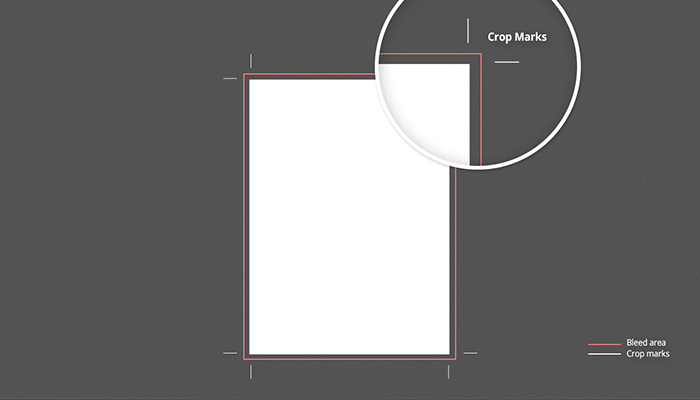
An overview of crop marks
A typical print document has some marks that serve as guidelines for the printers. But what precisely these marks are known, and what is their purpose? These crop marks inform the printers about their limitations when cutting a document for printing.
Such documents include brochures, posters, magazines, books, business cards, product packaging, signage, and flyers.
After printing a design, a machine will cut the design sheet according to its crop marks.
So, crop marks indicate the space from where the paper should be cut (cropped) post printing.
When to use crop marks for printing?
Crop marks are needed whenever a design document needs to be trimmed after printing. But check with your printer if your print project should use crop marks.
Who adds crop marks?
If a document that has to be cut after printing doesn’t have crop marks, a printer can add it. However, it is encouraged that the designers should add it beforehand. Since the designer knows the final look of the design, so it should be added by them only.
An overview of safety, trim, and bleed measurements
Safety, trim, and bleed lines ensure setting up the document correctly for printing. Crop marks depend on safety, trim, and bleed lines to take a cue for flawless printing. While bleed limits the extension of design elements beyond the trim line, the trim line ensures the final size of the printed document after cropping.
The safe area refers to the margin falling under the trim line where you can place your design elements to avoid them being trimmed off during printing. Let’s understand each point separately.
Safety line
Safety lines mark the area within the trim line. This is the area where you should be placing your document’s crucial information or elements of design. If you place any element out of this area, the printer might cut it out.
Therefore, safety lines create a safe area where a document’s main content, such as text and images, sits. It forms the center of a magazine page. Another purpose of a safety line is to ensure consistency of the borders you draw around a design.
Generally, the area of 0.125 inches (3mm) inside the trim line is considered safe. Your most essential document elements should preferably be placed within this area.
Trim line
The trim line is the crop mark showing the edge of a document. The printer cuts a document from this line. Therefore, a trim line sets the final size of a printed piece. It determines the size of your document post printing.
Ensure it is visible to the printer or when the edge of the document may get covered once you add the bleed area.
Bleed
Bleed refers to the space that gets trimmed off during printing. It’s the part of the edges of the document that allows printers have a small space to adjust the design inconsistencies.
So, by knowing the crop and bleed marks, the printer identifies which design elements has to be printed at the edge of the documents.
Bleed avoids white spaces during final document trimming.
Types of bleeds
Bleeds are of two types – full and partial. Full bleed indicates to the printer that each document element can reach the bleed area. Partial bleed shows that only some elements will be shown to the edge, leaving a white space margin.
Bleed measurement
Bleed measurement is not the same everywhere. In the USA, the bleed area is ⅛ inches. In Europe and Japan, the standard bleed size is 3-5 mm beyond a document’s trim line. So, the printer should discuss the bleed area with the client before printing.
Standard measurements for print
The printers must follow specific guidelines before printing a graphic design. However, these guidelines are not the same everywhere. Instead, they vary depending on the client’s requirements. Then, different countries follow different standards regarding print guidelines.
Here are the measurement guidelines most projects follow in the US.
Tips to add crop marks and print guidelines
When sending a document to your printer, check out whether the print guidelines have been added to your document. Here’s how you can add print guidelines to your document.
Choose the right file types
First, ensure you send your graphic design work and guidelines to the printer using the right file type. So, find out which file type your printer is comfortable with. Add print crop marks to your design to help the printer understand it.
Place the marks correctly
Take the recommended measurements of the safety, bleed, and trim lines into account. You can also input the measurements in numerical values rather dragging and dropping the elements.
Cover the design elements to the bleed line
Your edge graphics should extend up to the bleed line. You can use resize tools for this purpose. In case the document has a background image, it should be large enough to extend up to the bleed line.
Many design software have print guidelines. You can access them using the editing window.
Use crop marks only if the document is ready to print. That helps the printer know where to crop the document for printing.
Here is how you will add print guidelines to your design files in different software.
Wrapping Up
An artwork should be printed flawlessly, saving its inner and peripheral elements. Such a document must mention safety, trim, and bleed lines guidelines. The printer will first consider them before cutting the artwork for printing. These guidelines play a crucial role in determining the print quality.